
Use Day Planning and the Route Planner
TailDesk Pro includes Day Planning for businesses that work with bookings on specific days and, when needed, customer locations. The page combines a daily booking overview with the Route Planner, so you can review the day’s work first and switch to route optimization when you need it.
Before you can use Day Planning
Day Planning becomes available when the TailDesk Pro Routes module is enabled.
- Go to TailDesk > Settings > Routes.
- Enable Route planning and geocoding enabled.
- Optionally configure a default Start location and End location.
- Edit the service and open its Routeplanning tab.
- Check the service’s Address format when you want bookings to be available for route calculation.

Open Day Planning
Day Planning now has its own menu entry whenever the Routes module is enabled.
- Pet Sitter users: use the main Day Planning menu item.
- Administrators: open Day Planning from the Services menu.
You can still reach Day Planning from relevant planning links elsewhere in TailDesk. The page works with one selected date at a time. Use the Date field and Show button to load another day.
Use the Bookings tab
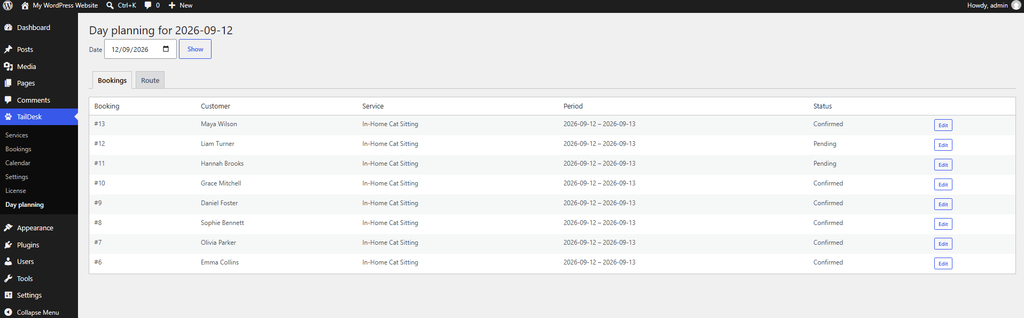
The Bookings tab gives you an operational overview of all bookings that overlap the selected date.
This overview is broader than the Route tab. It also includes bookings that are cancelled or cannot be used for route planning, so you can still see the complete booking picture for that day.
Each booking row includes an Edit action that opens the existing booking editor directly. On smaller screens, the booking table can be scrolled horizontally.
Use the Route tab
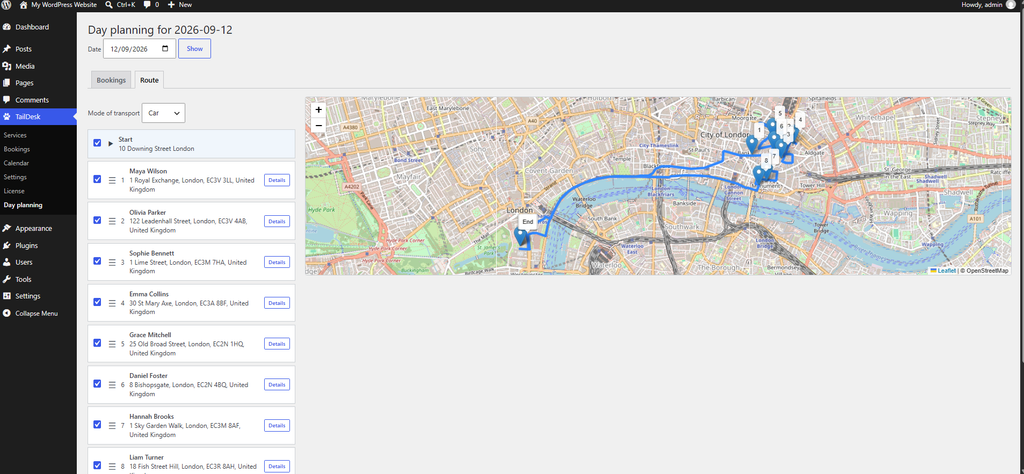
Open the Route tab when you want to calculate or adjust the travel route for the selected day. Route calculation only runs on this tab, so simply viewing bookings does not trigger route work.
The Route tab uses bookings with usable confirmed locations. Bookings without usable coordinates cannot be included in the calculated route.
How booking addresses are built
The service Address format uses booking field slugs prefixed with %. A default setup can use fields such as Street, House number and City.
%street %house_number, %cityYou can use a different field structure as long as the address format refers to valid booking fields for that service.
Confirm the booking location
After an address is saved, TailDesk can geocode it and return one or more possible locations.
On Booking Details, the Location area can show:
- An incomplete address
- Location candidates that still need confirmation
- A confirmed map location
- No usable coordinates, requiring manual marker placement
If TailDesk finds multiple candidates, choose the correct address and confirm it when saving. If no coordinates are found, place the marker manually on the map.
A booking without usable coordinates can still appear on the Bookings tab, but it cannot be included in a calculated route.
Choose the transport mode
On the Route tab, select the mode that should be used for route calculation:
- Driving / Auto
- Cycling / Fiets
- Walking / Lopen
The selected transport mode also affects the Google Maps directions link.
Include or exclude the start and end locations
If a Start location or End location is configured, the Route tab shows an include checkbox for each one.
This lets you temporarily remove a fixed endpoint from one route without deleting the saved Routes or service setting.
Choose which bookings belong in the route
Each booking stop with coordinates can be included or excluded individually.
Usable booking stops can show:
- An include checkbox
- The current route position
- Customer or booking context
- The booking address
- A Details link
- A draggable position for manual ordering
Bookings without usable coordinates are shown separately on the route workflow and cannot be included until their location is corrected. Use the booking link to fix or confirm the location.
Optimize the order
Click Optimal Order when you want TailDesk to calculate an efficient sequence for the selected booking stops.
You can also drag stops manually if you want to control the order yourself.
Confirm and save the route
After choosing the stops, transport mode and order, click Confirm Order.
TailDesk then calculates and saves the route using the current selection. After a successful calculation, the route summary shows:
- Total distance in kilometres
- Total travel time in minutes
If you change the stop order, included bookings, transport mode or endpoint selection after confirming, the saved route becomes out of date until you confirm it again.
Open the route in Google Maps
Click Open in Google Maps to open the selected route points in Google Maps directions using the chosen transport mode.
This is useful when you have finished planning in TailDesk and want to use Google Maps for turn-by-turn navigation.
Copy the stop list
Use Copy List to copy the selected stops for use outside TailDesk, for example in a message, note or another planning tool.
Configure different start and end locations per service
A service can inherit the global Routes start and end locations or override them in its own Routeplanning tab.
For both Start and End, you can:
- Use the global default
- Disable inheritance and set a service-specific location
- Disable inheritance and leave the field blank to use no fixed point on that side
This is useful when different services start from different offices, homes or operating areas.
Common Day Planning and route problems
- Day Planning is not in the menu: check that the Routes module is enabled under TailDesk settings.
- Booking is visible under Bookings but not usable for the route: confirm that its address has usable coordinates.
- Fewer than two valid route locations: include at least two usable route points.
- Route calculation fails: the route service may be unreachable or may have returned an invalid result.
- Route data is stale: refresh the page when bookings or route selection changed underneath the current screen.
- Wrong location: return to Booking Details and move or reconfirm the booking marker.
A practical daily workflow
- Open Day Planning and select the correct date.
- Use the Bookings tab to review all bookings for that day and edit anything that needs attention.
- Open the Route tab when you are ready to plan travel.
- Check that the bookings you want to route have confirmed locations.
- Select the bookings and optional fixed Start/End points.
- Choose Driving, Cycling or Walking.
- Use Optimal Order or arrange the stops manually.
- Click Confirm Order and review the total distance and travel time.
- Use Open in Google Maps when you are ready to navigate.
Day Planning is a TailDesk Pro operational workspace: the Bookings tab gives you the complete day overview, while the Route tab turns routeable bookings into a practical travel plan.